Briidea 400W Dog House Heater review
Have you ever worried about how to keep your pet warm and safe during freezing nights without turning your home into a sauna?
, 32℉-122℉ Temperature Range, 11.5FT Anti-Chew Cord, Heats Up to 120 Cubic Feet Dog Houses, Chicken Coops Rabbit Cages")
, 32℉-122℉ Temperature Range, 11.5FT Anti-Chew Cord, Heats Up to 120 Cubic Feet Dog Houses, Chicken Coops Rabbit Cages here.")
Product Overview
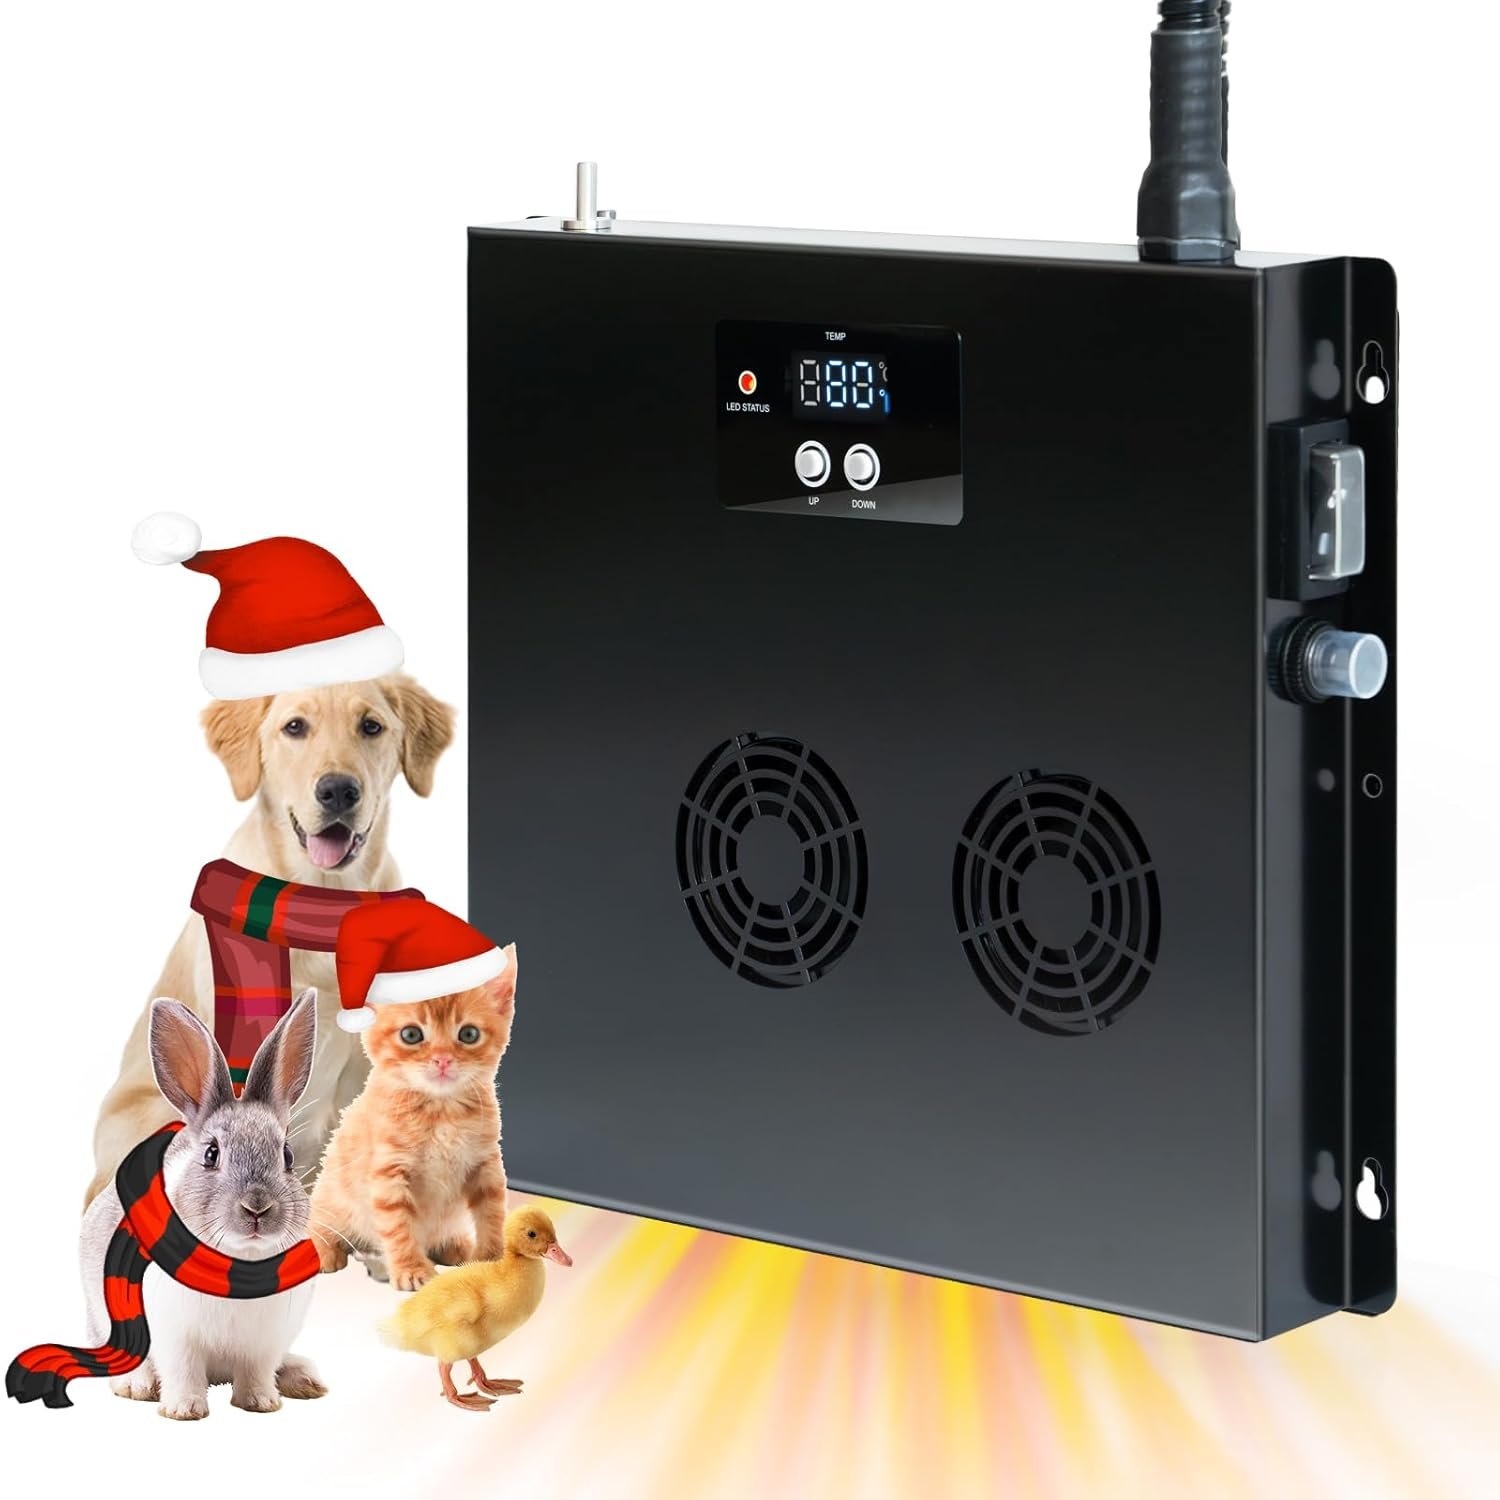
You want a reliable way to keep your dog, rabbit, or chicken cozy when temperatures drop, and the Briidea 400W Dog House Heater with PTC Rapid Heating looks built for that job. It promises instant heat in 3 seconds, an adjustable temperature range from 32℉ to 122℉, and a chew-resistant 11.5-foot power cord — all features that make it appealing for outdoor and semi-outdoor pet housing.
What this unit is designed to do
This heater is built to warm small enclosed spaces up to about 120 cubic feet, making it suitable for typical dog houses, rabbit cages, and chicken coops. The slim profile and mesh air vent mean it won’t take up much room while helping to keep pet hair and debris from getting into the unit.
Key Features Breakdown
You’ll want to understand the main features at a glance so you can judge whether the heater fits your needs. Below is a table that breaks down the most important specs and what they mean for real-world use.
| Feature | Specification | What it means for you |
|---|---|---|
| Heating Type | PTC ceramic heating | Heats quickly, self-regulates temperature for safer operation |
| Power | 400W | Stronger than low-wattage pads but still energy-efficient compared to high-wattage heaters |
| Warm-up Time | ~3 seconds | Nearly instant warmth so pets feel heat fast |
| Coverage | Up to 120 cubic feet | Suitable for small to medium dog houses, coops, rabbit enclosures |
| Temp Range | 32℉–122℉ | Wide range lets you adjust based on outdoor conditions and pet needs |
| Fan | Dual ball-bearing fan | Even heat distribution and improved durability |
| Power Cord | 11.5 ft, chew-resistant, UL certified | Extra length for placement and built-in chew protection for safety |
| Air Vent | Mesh vent | Keeps hair and debris out, helps reduce maintenance |
| Display | Temperature display with auto-off | Easy to set, screen turns off after 30s so it won’t disturb sleeping pets |
| Installation | Screw-mount, simple | Quick to mount to a wall or side of a house/coop |
| Extra fan runtime | 5 minutes after set temp | Ensures even distribution before cycling off |
You’ll find that these features combine to give a practical heating solution for exterior pet spaces, prioritizing speed, safety, and ease-of-use.
, 32℉-122℉ Temperature Range, 11.5FT Anti-Chew Cord, Heats Up to 120 Cubic Feet Dog Houses, Chicken Coops Rabbit Cages")
, 32℉-122℉ Temperature Range, 11.5FT Anti-Chew Cord, Heats Up to 120 Cubic Feet Dog Houses, Chicken Coops Rabbit Cages today.")
How PTC Heating Works and Why It Matters
You might not be familiar with PTC (positive temperature coefficient) technology, but it’s worth knowing because it affects safety and efficiency. PTC heaters use a ceramic element that increases resistance as it warms, which naturally limits current and helps prevent overheating.
That means the Briidea 400W heater gives you fast heat while reducing the risk of runaway temperatures. For pet areas where safety is critical, that self-regulating behavior is an important advantage.
Why the 3-second warm-up is useful
Almost instant heat reduces the time your pet spends in the cold when they first enter their shelter. If your pet goes in and out frequently, you’ll appreciate how quickly warmth is available rather than waiting minutes for a traditional heater to get going.
You’ll also notice less fluctuation in comfort levels because the fan and PTC combo kick in quickly and distribute heat evenly.
Coverage, Sizing, and Realistic Expectations
You need to know whether “heats up to 120 cubic feet” is sufficient for your setup. To picture that, a typical small dog house (inside) might be 2–4 cubic feet for a small breed or up to 40–80 cubic feet for medium breeds. A 120 cubic foot volume corresponds roughly to a 4 ft x 4 ft x 7.5 ft space or similar configurations.
If your dog’s house is insulated and compact, the Briidea will perform better than in a large, uninsulated run. For very large dog houses or poorly insulated structures, you’ll either need additional units or improved insulation to reach the same comfort level.
How to estimate your space
Measure the interior length × width × height in feet and multiply to get cubic feet. If your result is under 120 cubic feet and you have reasonable insulation, this heater should be capable of maintaining comfortable temperatures for most small and medium pets.
You’ll get more consistent results if you combine the heater with simple insulation (like foam boards or straw for livestock), which helps trap the generated heat.
, 32℉-122℉ Temperature Range, 11.5FT Anti-Chew Cord, Heats Up to 120 Cubic Feet Dog Houses, Chicken Coops Rabbit Cages")
, 32℉-122℉ Temperature Range, 11.5FT Anti-Chew Cord, Heats Up to 120 Cubic Feet Dog Houses, Chicken Coops Rabbit Cages here.")
Temperature Control and Display
You’ll be able to set the temperature anywhere between 32℉ and 122℉ to match what your pet needs. The temperature display makes adjustments easy to see and tweak, and the screen auto-turns off after 30 seconds so it won’t keep a light source on near sleeping animals.
The unit’s cycle behavior—where the fan runs five minutes after reaching the set temperature to distribute heat evenly before shutting off—helps maintain consistent warmth without continuous running, which saves energy and reduces noise.
Recommended settings by pet and conditions
For small dogs and rabbits in cold climates, you’ll likely choose settings in the 50–70℉ range when temperatures are near freezing. For chickens or more cold-tolerant animals, lower settings can be effective. Remember that individual needs vary by breed, size, age, and health, so monitor your pet’s behavior and adjust accordingly.
You’ll find that the digital readout and precise range give you fine control over comfort.
Safety Features and Considerations
Safety is crucial when heating spaces with animals, and Briidea addresses several common risks. The PTC element reduces overheating risk, the fan ensures even heat distribution, and the chew-resistant UL-certified 11.5-foot cord reduces electrical hazard potential from curious chewers.
The mesh air vent blocks pet hair and debris, helping prevent clogging or internal buildup that could cause issues. Still, you’ll want to mount the heater securely and place it where pets cannot directly gnaw at internal parts.
What you should still watch for
Even though the cord is chew-resistant, it’s not chew-proof; supervising animals and using protective conduit or cord wraps adds another layer of security. Keep bedding and flammable materials clear of the heater, and check the unit periodically for damage or build-up.
You’ll also want to ensure the power source and wiring are appropriate for outdoor use if the heater is used in detached structures like coops or kennels.
Installation and Placement Tips
The Briidea heater uses a simple screw-mount system for installation, which you can complete quickly with a drill and basic tools. Mount it on a wall or raised surface inside the shelter that directs heat into the main living area but is out of reach of animals’ mouths and paws.
Position it so airflow isn’t blocked and the mesh vent stays clear of bedding or clutter. If the shelter is prone to moisture, mount the heater in a protected location and ensure electrical connections are waterproofed.
Best placement practices
Install the heater at a low to mid height where warm air will rise through the living space, but avoid places where the unit might be kicked or rubbed. Keep 6–12 inches clearance from walls and bedding for proper airflow and to avoid collecting debris in the mesh vent.
You’ll also benefit from placing the cord entry point away from paths where animals can tangle or chew it.
Maintenance and Cleaning
You’ll find the Briidea relatively low maintenance due to its mesh vent and slim design. Periodically check the mesh for hair or dust and gently vacuum or brush it to maintain airflow. The unit’s slim profile makes it easier to access for routine inspection.
Also check the cord for any signs of wear, fraying, or chewing, and inspect mounting points to ensure the screws remain tight. Routine checks every couple of weeks in heavy-use seasons are a good habit.
Seasonal maintenance checklist
Before winter: confirm secure mounting, check cord integrity, and test the unit to verify it reaches and holds the set temperature. During winter: clear any debris from the mesh vent and confirm the unit cycles properly. After winter: clean the exterior and store or leave mounted depending on year-round needs.
You’ll reduce long-term issues by keeping the mesh free of buildup and monitoring the unit’s physical condition.
, 32℉-122℉ Temperature Range, 11.5FT Anti-Chew Cord, Heats Up to 120 Cubic Feet Dog Houses, Chicken Coops Rabbit Cages")
Performance in Different Conditions
You’ll notice the heater performs best in enclosed, insulated spaces. In well-insulated dog houses, the 400W PTC heater gets to the set temperature quickly and cycles on and off to maintain it efficiently. In uninsulated or drafty spaces, performance will decrease and the heater may run more frequently or struggle to maintain higher temperatures.
In extremely cold climates (well below freezing), this unit is designed to supplement warmth rather than replace broader weatherproofing measures. For very large or poorly insulated kennels, multiple heaters or additional insulation will improve outcomes.
How to maximize performance
To get the most out of the Briidea, combine it with insulation (foam panels, straw, or other appropriate materials) and minimize drafts. You’ll also improve efficiency by reducing the shelter’s effective cubic footage through internal dividers or windbreaks.
Routine monitoring of the set temperature and your pet’s comfort will help you find the sweet spot that keeps energy use reasonable while maintaining warmth.
Use Cases Beyond Dog Houses
Although labeled a dog house heater, you’ll find the Briidea works well for chicken coops, rabbit cages, kitten shelters, and other small animal enclosures. The slim design and mounting flexibility make it easy to adapt to many situations where animals need supplemental heat.
For newborn chicks or young rabbits, controlled warmth is critical for survival, and this heater can provide stable, adjustable conditions needed during vulnerable stages. Just be mindful of appropriate temperatures for each species to avoid overheating.
Considerations for livestock and small animals
When using for poultry or multiple-animal setups, ensure the heat is distributed evenly and not concentrated in one spot. You’ll want to avoid creating hot zones where birds or animals cluster and overheat. Use the thermostat feature to maintain a steady environment.
You’ll also need to guard the cord and unit against pecking or chewing in group environments.
Comparison to Other Heating Options
You’ll find several alternatives for warming pet shelters: heat lamps, heated pads, and baseboard-style outdoor heaters. Each has pros and cons when compared to the Briidea 400W unit.
- Heat lamps: Provide intense localized heat but present higher fire risk and uneven distribution.
- Heated pads: Provide direct contact warmth but may not be sufficient for larger spaces and can attract pests or chewing.
- Baseboard/outdoor electric heaters: Provide broader space heating but often require higher wattage and more energy.
The Briidea aims to balance safety, speed, and even distribution with a moderate wattage and PTC element that reduces overheating risk. You’ll get faster heat-up than many pads and safer operation than exposed heat lamps.
When the Briidea is the better choice
If you want quick, controlled heat in a compact space and prioritize safety features like PTC regulation and a chew-resistant cord, the Briidea is a strong choice. It’s particularly useful when you need an all-around indoor/outdoor solution that isn’t bulky and won’t consume excessive power.
You’ll want to consider alternatives if you need to heat very large spaces or want floor-level warmth targeted right under a pet.
Pros and Cons
You’ll appreciate both strengths and trade-offs before deciding on this heater for your pet’s space.
Pros:
- Rapid 3-second warm-up gives immediate comfort.
- Adjustable 32℉–122℉ range suits multiple species and needs.
- PTC ceramic heating enhances safety and self-regulation.
- Dual ball-bearing fan distributes heat evenly and is durable.
- 11.5-foot chew-resistant UL-certified cord adds safety and flexibility.
- Mesh vent reduces hair buildup and maintenance.
- Slim design and easy screw installation save space and time.
Cons:
- 400W may be underpowered for very large or poorly insulated shelters.
- Chew-resistant cord isn’t chew-proof — additional protection may be needed for determined chewers.
- Outdoor use requires attention to moisture protection and secure mounting.
- No built-in thermostat with remote app control; adjustments are manual at the unit.
You’ll need to weigh these points against your setup size, insulation level, and your pet’s behavior.
Troubleshooting Common Issues
If you encounter issues, the solutions are usually straightforward. Below are common problems and what you can try.
- Heater won’t power on: Confirm the outlet is live, check that the cord is fully plugged in, and inspect for visible cable damage. If the unit still doesn’t power on, test it on another outlet or have an electrician inspect the circuit.
- Unit powers on but doesn’t warm: Verify the set temperature is higher than ambient, and make sure the fan is unobstructed. Clean the mesh vent and test again. If still not heating, contact support for potential warranty service.
- Fan noise or irregular operation: Dust or hair in the fan can cause noise; power down and gently clean the mesh and fan area. If noise persists, the fan bearings may be worn and require replacement by a technician.
- Display issues: If the screen doesn’t show temperature or stays off, the auto-off feature may be active; press any button to reactivate the display. Persistent display failure should be handled through customer support.
You’ll find proactive cleaning and periodic inspection catch many problems early.
Installation Step-by-Step
You’ll be able to set this heater up quickly with basic tools and a few steps. Follow the manufacturer’s instructions closely for safe placement.
- Choose a secure interior wall or raised mount point clear of bedding and direct contact with animals.
- Mark the screw positions using the unit’s mounting holes.
- Pre-drill pilot holes if needed for your mounting surface (wood, plywood, or composite).
- Use screws provided or comparable outdoor-grade screws to secure the heater bracket.
- Plug in the unit and set the temperature to the desired level, then observe the unit for proper operation.
After installation, allow the unit to run through a few cycles and make sure it heats, the fan operates, and the set temperature is reflected accurately on the display.
Safety check after installation
Make sure the cord isn’t in a path your pet can reach and protect it with conduit if needed. Ensure the heater has adequate clearance and that no flammable materials are nearby. You’ll reduce hazards by checking everything before leaving the shelter in use.
Practical Tips for Everyday Use
You’ll want a few practical tips to get the longest, safest use out of your heater:
- Use insulation first: improving the shelter’s insulation reduces the heater’s workload.
- Monitor pet behavior: pets will tell you if they are too hot or too cold—adjust the temperature based on their comfort.
- Use cord protection: even chew-resistant cords benefit from conduit or tubing if you have determined chewers.
- Keep the mesh clear: regular light cleaning prevents airflow reduction and keeps the unit efficient.
- Consider a timer or outlet thermostat: if you want scheduled operation, pair the heater with an outdoor-rated timer or thermostat for automated control.
You’ll find these small steps increase efficiency, safety, and lifespan of the unit.
Warranty and Support Considerations
You should confirm the seller’s warranty and return policy before purchase to protect your investment. Many heaters include manufacturer support for defects and operational issues, but terms vary by seller and region.
If you run into issues with performance, wiring, or defects, contact the retailer or Briidea customer support and have your purchase information ready for faster assistance.
What to have ready for support
Keep the order number, serial number (if available), and photos of the unit and setup handy when you contact support. You’ll speed up troubleshooting and potential warranty claims by providing clear documentation.
Frequently Asked Questions
You’ll likely have a few common questions before buying — here are direct answers.
Q: Can I use this outdoors in a dog house that isn’t fully enclosed?
A: It’s best in enclosed or semi-enclosed spaces; for exposed outdoor use you must ensure protection from moisture and secure electrical connections.
Q: Is the cord chew-proof?
A: The cord is chew-resistant and UL certified, but not chew-proof. For determined chewers, add protective conduit or mount the cord out of reach.
Q: How noisy is the fan?
A: The dual ball-bearing fan is designed for durability and quiet operation, but you may hear a low hum, especially during the fan’s 5-minute post-heat cycle.
Q: Can it be used for newborn animals?
A: Yes, it can provide supplemental warmth for young animals; match the appropriate temperature for the species and closely monitor them to avoid overheating.
Q: How often should I clean the mesh vent?
A: Check every 1–2 weeks during heavy use and clean as needed to maintain airflow.
You’ll find this information useful for deciding whether this heater suits your situation.
Final Verdict and Buying Considerations
If you want a compact, quick-heating, relatively safe option for winter pet comfort, the Briidea 400W Dog House Heater with PTC Rapid Heating is a strong contender. You’ll get near-instant warmth, a broad temperature range, chew-resistant cording, and features that reduce maintenance and safety risk.
Before buying, measure your shelter’s cubic footage, consider insulation upgrades, and plan cord protection if your animals are chewers. If your setup matches the recommended coverage and you apply sensible safety and placement practices, this heater is likely to be a valuable addition to your pet-care toolkit.
Who should buy this heater
You should buy this if you need a fast, efficient heating solution for small to medium shelters and you want safety features like PTC regulation and a chew-resistant cord. If you have a very large or uninsulated space, consider additional units or insulation to complement this heater.
You’ll enjoy the peace of mind of predictable, adjustable warmth for your pets when you pair the unit with proper installation and routine checks.
Additional Resources and Next Steps
You should read the full manual that comes with the product for detailed safety instructions and mounting specifications. If you’re unsure about electrical setup for detached outbuildings, consult a qualified electrician.
After installation, monitor your pet’s behavior for a few days and tweak temperature settings until you find a comfortable balance. You’ll quickly learn how the heater integrates into your routine and how to keep your pet safe and warm throughout the colder months.
, 32℉-122℉ Temperature Range, 11.5FT Anti-Chew Cord, Heats Up to 120 Cubic Feet Dog Houses, Chicken Coops Rabbit Cages.")
Disclosure: As an Amazon Associate, I earn from qualifying purchases.